• Skip to main content
  • What We Do
  • Our Work
  • About
  • Contact

Mackey

Lab Notes

March 12, 2018 by Mackey

Leaving Comments in InvisionApp

InvisionApp is a product design collaboration platform. Through InvsionApp we can collaborate on design prototypes by adding comments and feedback directly to the design screens.

Adding/Removing A Comment

To add a comment to a prototype screen:

  1. Use the link provided to you to open the prototype and go into a screen.
  2. Toggle to “on” to enter into comment mode.
  3. Click anywhere on the screen to leave a comment.
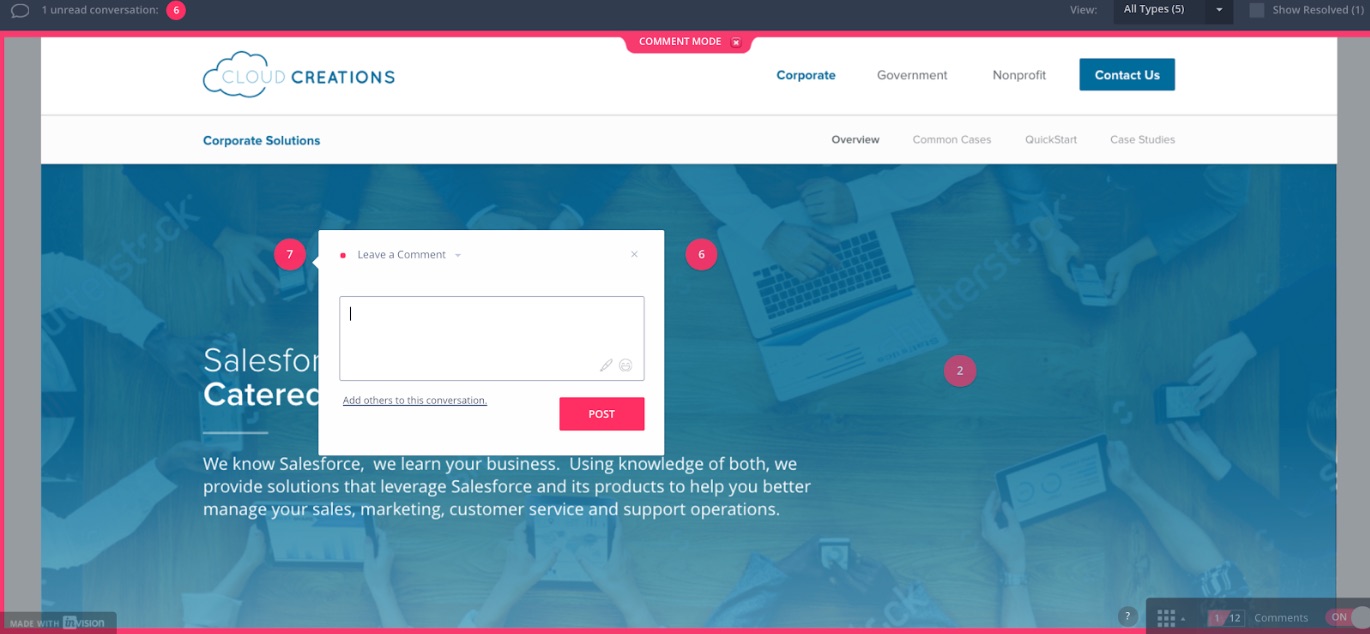
  4. If you do not have an account, InVision will authenticate your comment by asking for your name and email address.
  5. Continue leaving comments to any areas that you have feedback!

Delete a Comment

To delete a comment you must either be the prototype owner or the user that left the comment.

  1. Hover to the right the commenter’s name/timestamp- this will reveal a trash can and pen icon.
  2. Click the trash can to delete that comment.

Adding Someone to Your Comment

You can notify someone on a prototype or board by using our @ mention feature in a comment. Simply enter @ along with their name (or @project or @conversation) in your comment/reply.

If you’re commenting on a screen on a prototype or board you don’t own, by default the screen owner is always @mentioned. Their @mention name will not appear in the reply box, but they will be listed in the “x person will be notified” area.

Replying to an Existing Comment

When you reply to an existing comment, Inbox automatically inserts an @mention for the last person who commented, as well as any other users that have been @mentioned.

Filed Under: FAQ, Knowledge Base

March 2, 2018 by Mackey

WordPress Shortcode with Parameters that Pass to Template

In our particular instance, we created a custom post type for Community Testimonials with a Taxonomy for Types. The Taxonomy has various terms.

We then wanted to create a shortcode that the content manager could use to display Community Testimonials based on various Types. In the end we wanted to create a shortcode that looked like [customer-testimonial type=”{THE TAXONOMY TERM}”]. This, in turn, would display all Customer Testimonials within a particular Type Term.

The output would look something like this on the frontend:

We did not want to include all the markup and query code within the functions.php in order to keep everything cleaner. Instead, we decided to create a new PHP file within the theme directory, customer-testimonials.php, to house all our markup and output. The caveat, we still wanted to pass the type parameter value to the PHP file. In the end this was pretty easy, but took us a minute to figure out, so thought we’d share.

The Code

Within functions.php or wherever you are housing the function for the shortcode, create the shortcode with the parameter:

/* Community Testimonials Shortcode */
function ctest_shortcode($atts) {
    extract(shortcode_atts(array(
        'YOUR PARAMETER' => 'YOUR PARAMETER'
    ), $atts));
  
  /* Call to template */
    ob_start();
    include(locate_template('YOUR-TEMPLATE.php'));
    return ob_get_clean();
}
add_shortcode('test', 'ctest_shortcode');

Next, within your theme directory, create a new file, in our case YOUR-TEMPLATE.php. Within this file you can add any markup you want and it will be outputted when you include your shortcode. In our instance, we are creating a query of the custom post type with the taxonomy for Types and the variable is the term.

Our query:

    <?php
      $args = array(
        'post_type' => 'community_test',
        'posts_per_page' => '100',
          'tax_query' => array(
              array(
                  'taxonomy' => 'testimonial_type',
                  'field' => 'slug',
                  'terms' => $YOUR_PARAMETER,
              )
          )
      );
       
      // Custom query.
      $query = new WP_Query( $args );
       
      // Check that we have query results.
      if ( $query->have_posts() ) {
       
          // Start looping over the query results.
          while ( $query->have_posts() ) {
       
              $query->the_post(); 
    ?>

Because in functions we use:

include(locate_template('YOUR-TEMPLATE.php'));

We can pass the parameter variable to our new file in our theme (YOUR-TEMPLATE.php) and then utilize it. In our case the variable is $YOUR_PARAMETER, replace this whatever the variable is you are using.

Then include the shortcode in your page, post, or wherever with the parameter and badabingbadaboom, you should be cooking.

Any questions, leave them in the comments.

Filed Under: Code Snippets, Wordpress

August 30, 2017 by Mackey

Advanced Custom Fields (ACF) Options Page and Polylang

We’ve been working recently on a multilingual site for Sonoma County Adult Education and it is important that they have full support for both English and Spanish. Since we’re using WordPress to build the site we opted to use the WordPress plugin Polylang. Polylang has been very simple to setup and configure even with our multiple taxonomies and custom post types and even with Advanced Custom Fields (ACF).

When we build sites we use Advanced Custom Fields often to build out a more custom backend for the content manager and cater it to the client’s needs. This includes usually a “Site Options” page that has various fields (images, text, WYSIWYG, etc) that allow the client to manage more global content. But unlike posts, pages, taxonomies, etc there was no out of the box support for multiple Site Options based on languages. In other words, there was just one single Site Options page and we needed two versions — English and Spanish.

We found a nifty little solution on the ACF forums to integrate ACF Options Page and Polylang, you can see the full post here. But the crux of it is to register multiple ACF Option Pages based off the languages you are supporting with Polylang.

Register ACF Options with Polylang Support

In your functions.php file add the following.

if( function_exists('acf_add_options_page') ) {

  // Language Specific Options
  // Translatable options specific languages. e.g., social profiles links
  // 
  
  $languages = array( 'en', 'es' );

  foreach ( $languages as $lang ) {
    acf_add_options_page( array(
      'page_title' => 'Site Options (' . strtoupper( $lang ) . ')',
      'menu_title' => __('Site Options (' . strtoupper( $lang ) . ')', 'text-domain'),
      'menu_slug'  => "site-options-${lang}",
      'post_id'    => $lang
    ) );
  }

}

What are we doing above? Essentially we are registering an ACF Options Page for each language. Where it reads  $languages = array( 'en', 'es' ); replace en and es with your languages or add additional languages. Change Site Options text to whatever you want your Options page to be named.

Add the_field() to Your Templates

Usually when using the ACF Options page to include the field you would write,the_field('YOUR_FIELD','option'); but instead, we are going to replace ‘option’ with ‘pll_current_language(‘slug’).’ So your final code for including a field would look like  the_field('YOUR_FIELD',pll_current_language('slug')); .

Final Code

the_field('YOUR_FIELD',pll_current_language('slug'));

This works for repeater fields, logic, and pretty much anything you can do normally with ACF when including in the template.

Hopefully, this saves someone some trouble. If you have any questions leave them in the comments.


Filed Under: Code Snippets, Development, Wordpress

July 12, 2017 by Mackey

Webfont is ugly. Font smoothing for better rendering fonts. Sorry, no Windows support.

Does your webfont or fonts on your website not render correctly or look a little “chubbier” than they should? If so, you may just need to add these two declarations to the body element in your CSS file.

-webkit-font-smoothing: antialiased;
-moz-osx-font-smoothing: grayscale;

Of course, there is no out of the box support for Explorer or Edge other than providing a SVG format of the font, but since Webkit and Firefox browsers control nearly 66% of the market and Edge and Explorer only account for 22% of the market, anyone that really cares about the a font looks probably is using Chrome or Safari or Firefox…

* Browser market share as of July 2017.

Filed Under: Code Snippets

June 25, 2017 by Mackey

How to do a Hard Refresh in Firefox, Chrome and Internet Explorer

Sometimes you just need a hard refresh! 

Why? Your browser often caches many files so that sites load faster and do not need to load quite as many files from the server. The problem comes into play when a site updates files, but the browser is still loading old files that are cached within your browser. Time for a hard refresh!

*Note you can also go through the trouble of clearing your cache, but that’s just a pain.

Let’s jump in…

Firefox

Windows:

  • Hold the Ctrl key and press F5
  • Or, hold the Ctrl key and Shift key and then press R

Mac:

  1. Hold the Shift key and click the Reload button
  2. Or, hold the Cmd key and Shift key and then press R

Chrome:

Windows:

  • Hold the Ctrl key and click the Reload button
  • Or, hold the Ctrl key and press F5

Mac:

  • Hold the Shift key and click the Reload button
  • Or, hold down Cmd key and Shift key and then press R

Internet Explorer:

Windows only, because no Mac user wants this on their computer (:

  • Hold the Ctrl key and press the F5
  • Or, hold the Ctrl key and click the Refresh button

Filed Under: FAQ, Knowledge Base

April 30, 2017 by Mackey

Adding Payment Source for a Webfaction Account

  1. Go to https://my.webfaction.com/ and enter your username and password.
  2. Click Login
  3. Once you’re into your account, click on “Billing” then click on “Payment Sources” and then click “Add new payment source.
  4. Once you have done so, you should be able to add your credit card and payment details.

Filed Under: Knowledge Base, Webfaction

  • « Go to Previous Page
  • Go to page 1
  • Go to page 2
  • Go to page 3
  • Go to page 4
  • Interim pages omitted …
  • Go to page 11
  • Go to Next Page »
Mackey Creative Lab
Web Design and Development, Branding, Graphic Design and Marketing Strategy
680 East Colorado Blvd., Suite 180 & Second Floor, Pasadena, CA 91101
info@mackeycreativelab.com // 626 214 5093
© 2014-2021 Mackey, LLC, All Rights Reserved